How to Create a QR Code Menu for Your Restaurant
If you’ve been putting off switching to a digital menu, that’s understandable. Between running a kitchen, managing staff, and keeping customers happy, learning a new piece of technology probably isn’t high on your list. But setting up a QR code menu is one of the easiest wins you can give your restaurant, and it takes less time than you think.
This guide walks through the process from start to finish: choosing a platform, building your menu, and getting QR codes on your tables. No technical background required. If you can upload a photo and type a few sentences, you can do this.
What Is a QR Code Menu (and Why Does Your Restaurant Need One)?
A QR code menu is a digital version of your restaurant’s menu that customers access by scanning a QR code with their phone. Instead of handing out paper menus or uploading a PDF, you give guests an interactive, mobile-optimized experience that loads instantly.
How QR Menus Work
The flow is simple:
- A customer scans the QR code on your table (using their phone camera, no app needed).
- Their browser opens a mobile-friendly page showing your full menu.
- They browse items, read descriptions, see photos, and decide what to order.
The QR code itself doesn’t change when you update your menu. It always points to the latest version. That’s the key advantage over print: update once, and every table reflects the change immediately.
Benefits Beyond Going Paperless
Yes, you’ll save on printing costs. But the real benefits go deeper:
- Instant updates. Pull a dish, change a price, add a seasonal special, all live within seconds.
- Better customer experience. Mobile-optimized menus are easier to read than folded paper or (especially) pinch-to-zoom PDFs.
- Multilingual options. Serve international guests without printing separate menus.
- Analytics. See which items get the most views and when customers are checking your menu.
- Upselling opportunities. Photos, vivid descriptions, and strategic layout help sell higher-margin items.
- Hygiene. Fewer shared surfaces, a benefit customers have come to appreciate since the pandemic era.
Step 1: Choose a QR Menu Platform
You have options ranging from free QR code generators to full-featured menu platforms. Here’s what to actually look for:
Ease of use. If the platform requires a tutorial video longer than 10 minutes, it’s too complicated for a busy restaurant owner.
Template quality. Pre-designed templates save you hours and ensure your menu looks professional without hiring a designer.
Mobile experience. Your menu will be viewed on phones 95% of the time. The platform must prioritize mobile design.
Pricing. Some platforms charge per location, others per menu, others a flat fee. Make sure the pricing makes sense for your size.
AI features. Some newer platforms can generate your menu structure from a simple description, which saves a lot of setup time.
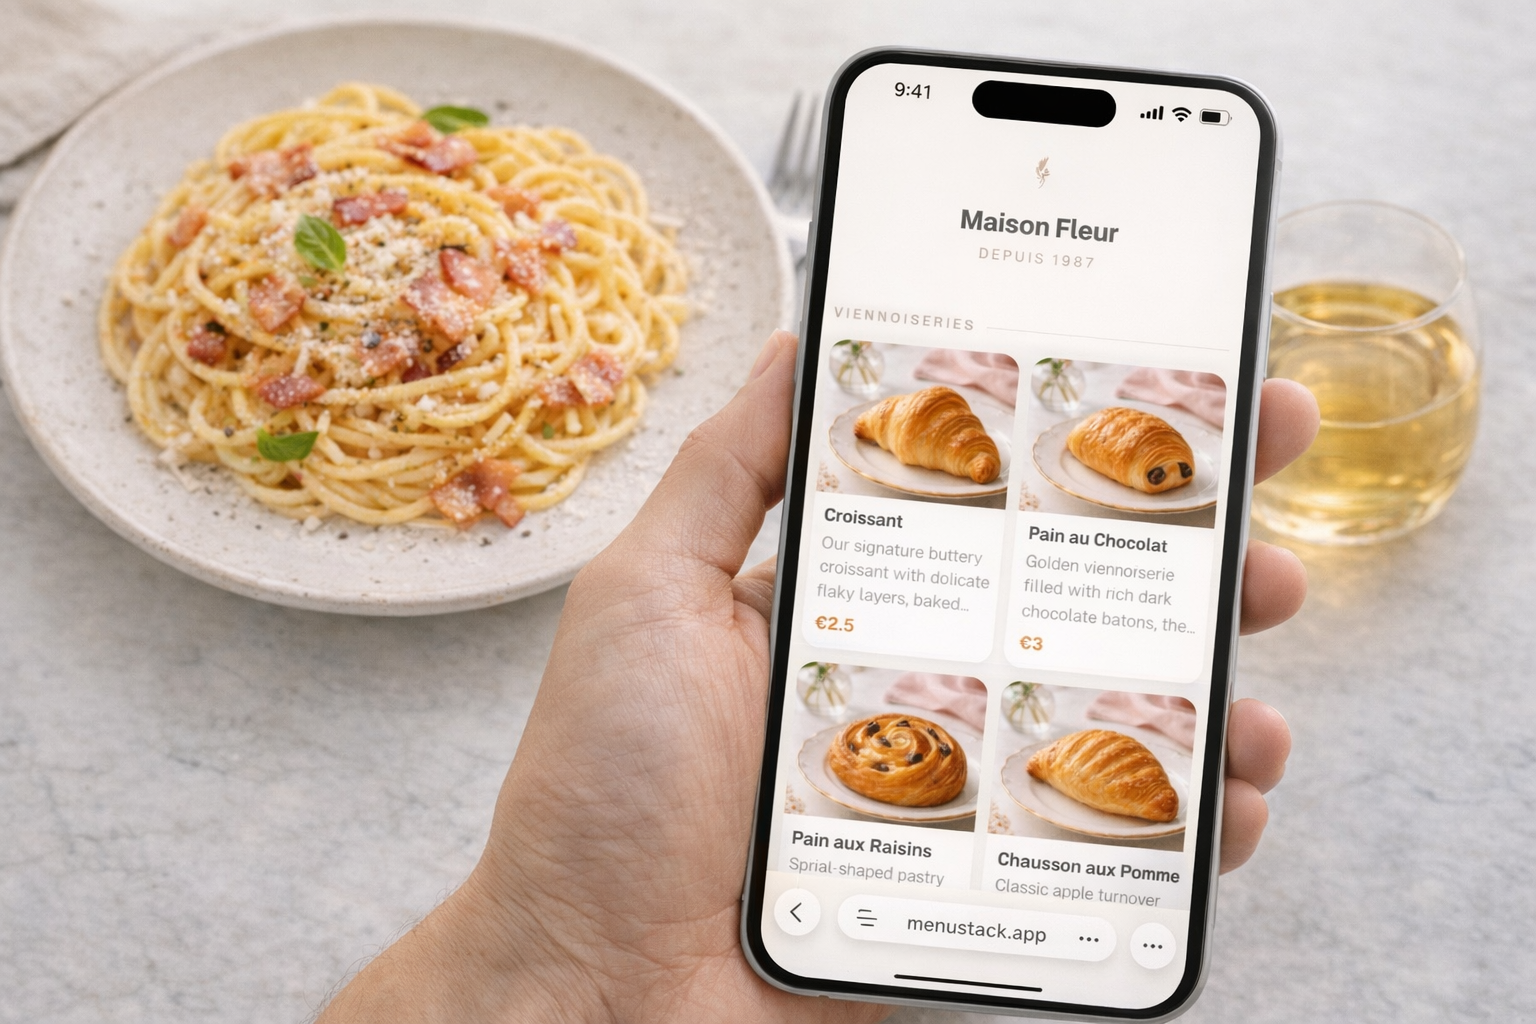
MenuStack, for example, offers a free tier with unlimited menus and a set of templates. If you want access to all curated templates and premium features, the Pro tier is $12 per month per menu (or $120 per year). The AI menu builder is included, which means you can generate a complete menu in minutes rather than typing everything by hand.
Step 2: Set Up Your Menu Content
Before you start building, gather your menu content. This is the step most people skip, and then they spend twice as long going back and forth between their menu platform and their existing menu.
Organizing Categories and Items
Map out your menu structure:
- Categories (Appetizers, Mains, Desserts, Drinks, etc.)
- Items within each category
- Prices for each item
- Modifiers if applicable (sizes, add-ons)
If you already have a printed menu or a PDF, use that as your reference. You don’t need to reinvent the structure. Just translate it to digital.
Writing Descriptions That Sell
This is where most restaurant menus fall short. “Chicken sandwich” tells customers nothing. “Crispy buttermilk-brined chicken thigh with house-made pickles, slaw, and smoked paprika aioli on a brioche bun” tells a story.
A few rules of thumb:
- Lead with the most appealing element. What makes this dish special?
- Use sensory words. Crispy, smoky, tangy, creamy, charred.
- Keep it between 15 and 25 words. Long enough to entice, short enough to scan.
- Be specific. “Locally sourced” is better than “fresh.” “72-hour sous vide” is better than “slow-cooked.”
If writing descriptions isn’t your strength, this is where an AI menu builder earns its keep. Platforms like MenuStack can generate descriptions based on your dish names and a brief description of your restaurant’s style.
Adding Prices, Photos, and Dietary Labels
- Prices: Be consistent with your format. Choose either $12 or $12.00 and stick with it.
- Photos: You don’t need professional photography for every item, but photos on your top 5-10 dishes can boost orders for those items more than you’d expect. Even well-lit smartphone photos work.
- Dietary labels: Mark items that are vegetarian, vegan, gluten-free, or contain common allergens. People look for these now, and having them shows you pay attention.
Step 3: Design Your Menu
Choosing a Template
Most QR menu platforms offer templates designed for different restaurant types. Here’s a quick guide:
- Cafes and coffee shops: Clean, minimal templates with good white space.
- Casual dining: Photo-forward templates that put your dishes front and center.
- Fine dining: Elegant typography-focused templates with restraint.
- Bars and nightlife: Dark-mode templates that feel right in low light.
- Fast casual and food trucks: Bold, simple templates optimized for quick scanning.
Don’t overthink this. Pick the template that closest matches your vibe. You can always switch later.
Adding Your Logo and Brand Colors
At minimum, add your restaurant’s logo and pick a color scheme that matches your brand. This takes about two minutes and makes the menu feel like yours rather than a generic template.
Most good platforms offer curated color palettes designed to work with each template, so you don’t need to be a designer to get something that looks right.
Using AI to Speed Up the Process
If your chosen platform has an AI menu builder, this is the time to use it. On MenuStack, you can describe your restaurant’s concept and cuisine, and the AI generates a complete menu structure with categories, items, descriptions, and suggested pricing guidance. You then review, edit, and customize.
Think of AI as a first draft, not a final product. It gets you 80% of the way there in a fraction of the time. Your knowledge of your dishes and your customers gets you the rest of the way.
Step 4: Generate and Print Your QR Code
Once your menu is live, you’ll need to get that QR code in front of customers.
Sizing and Placement Tips
- Minimum size: 2 x 2 inches for table placement. Larger for wall signage or window displays.
- Contrast matters. Dark code on a light background is most scannable. Avoid placing QR codes on busy patterns or dark surfaces.
- Test the scan distance. Your QR code should be scannable from at least arm’s length in normal lighting.
Adding a Call-to-Action
A bare QR code with no context gets fewer scans. Add a simple label:
- “Scan for Menu”
- “View Our Full Menu”
- “Scan to See Today’s Specials”
This small addition makes a real difference in scan rates.
Where to Place QR Codes
- Table tents or table inserts, the most common and effective placement.
- At the counter for quick-service restaurants.
- On the front door or window for passersby.
- On takeout packaging so customers can browse your menu later.
- On business cards or flyers for marketing.
Step 5: Train Your Staff
Your servers and hosts are the bridge between your QR menu and your customers. A 10-minute team briefing covers everything they need:
- How to explain it: “You can view our menu by scanning this QR code with your phone camera. It’ll open right in your browser, no app needed.”
- How to help guests who struggle: Walk them through the camera scan. Have a few paper menus available as backup for guests who prefer them.
- When to mention it proactively: New guests, large parties, and guests who seem to be looking for a menu.
You’re not trying to force everyone onto digital. Just make it the default, and keep paper menus around for anyone who prefers them.
Step 6: Keep Your Menu Updated
The biggest advantage of a digital menu is also the easiest to neglect. Set a rhythm for updates:
- Immediately: Sold-out items, price corrections, errors.
- Weekly: Review specials, featured items.
- Seasonally: Refresh seasonal sections, swap items, update photos.
The whole point of switching to digital is that updates are instant and free. Take advantage of that. A stale digital menu is no better than a stale printed one.
Common Mistakes to Avoid
Uploading a PDF and calling it a day. A PDF viewed on a phone is not a digital menu. It’s a bad experience with a QR code in front of it. Use a platform that creates a proper mobile-optimized menu.
Too many items. Digital doesn’t mean unlimited. Menu psychology research consistently shows that 7 items per section is the sweet spot. More than that, and customers get overwhelmed and default to something safe (usually a lower-margin item).
No photos on key items. You don’t need photos on everything, but your highest-margin dishes should have them. A good photo can increase orders for that item by 30% or more.
Forgetting the physical QR code experience. A wrinkled printout taped to the table isn’t the vibe. Invest in simple, clean table cards or inserts. They’re inexpensive and make a big difference in perceived quality.
Not testing on multiple devices. Before you go live, scan the code on at least 3 different phones. Check load time, readability, and photo quality.
Get Started Today
You don’t need to wait for the “perfect” time to switch. Start with your current menu content, pick a template, and get a QR code on your tables this week. You can refine and improve over time. That’s the whole point of going digital.
MenuStack’s free tier gives you unlimited menus and several professional templates, plus an AI menu builder that can generate your first menu in minutes. No credit card required.